Pages

Wednesday, May 27, 2015

A Very Lady Bug Birthday Party.

Little Miss Lylah Bug
I still cannot believe that our little girl is already two years old! I remember very vividly back to when I was pregnant and being annoyed at everyone telling me that it "will go very fast" and to "enjoy the little things" and "she'll be a teenager before you know it" blah, blah, blah. At the time I thought it was just another annoying thing that pregnant women had to deal with...kind of like when everyone thinks it's okay to touch your belly. 

BUT IT'S TRUE! The time has FLOWN by! And now I even find myself telling other pregnant friends to "enjoy them while they're young". Sheesh...now I'm getting old. 

Even though our little Bug is getting bigger, this is my favorite age yet! It is so cute watching her play and interact with her little friends. For her birthday party this year, I knew I wanted to make it super fun for her other two-year-old little buddies. 

Ten kiddos age 3 and under! Ha!

When I started to make up the guest list for the party, I sat back and laughed that we would be inviting more than 12 kids! Haha! This would definitely be a fun party. Between my husband and I's friends with kids, as well as family and their kiddos, we would have over 40 people coming...what happened to a simple kid party?? This was turning awesome! 


We decided to have the party and my husband's parents house. They have an amazing big backyard that was perfect! 

Despite a little soggy Oregon weather, the party turned out great!
Our BBQ theme was a big hit. 

I decided on a Lady Bug theme for her 2nd party. It seemed fitting since her nickname is "Lylah Bug". I'm not quite sure where the name came from, but it has stuck and will probably be with her for life...or at least until she hits high school and realizes she's too cool for it. Anyways, the BBQ plan for food and the outdoor setting went perfectly. It was a tad bit soggy, thanks to good ol' Oregon weather, but turned out to be super fun. 

I knew I wanted to try a candy table at this party. I've never attempted one before and I am always in awe of them when I see them at weddings or other parties! There is just something beautiful about a TON of candy...and I think the guests enjoyed taking some sweets with them to enjoy on the ride home. 

Isn't it awesome?!?!

My mom and sister-in-law made the cakes and cupcakes! 

The "Smash Cake"


I had a lot of fun making most of the decor myself. It's amazing what can be done with a bunch of scrapbook paper! I did buy some cute lady bug decor items from Party City as well as some red and black polka dot balloons. I found the polka dot table runner at a thrift store and used black plastic table cloths from the dollar store on all the outdoor tables. I did end up purchasing an instant download from Etsy for the Invitations (PapaCrabPaperie) and the Cupcake Toppers (digitalfield). I am so happy with how everything turned out! 

Each Kiddo got a goody-bag filled with a "lady Bug" net, bubbles, stickers and cute lady bug ears. (All found at the Dollar Tree).

One thing that my husband really wanted to do was a Pinata. I personally thought that two-year-olds might be a tad tooo young to be swinging a giant stick around...BUT it turned out to be the FUNNIEST thing ever, and one of THE BEST things at the party. It was hilarious!

Daddy teaching Lylah how to swing.

Klara was BY FAR the best hitter. LOL!!

Camden and Dad Ryan taking a swing.

CANDY!!

Another thing that my husband and my father-in-law really wanted to do was smoked ribs...so here's the shout out...they were messy, but so good!
Yep, here they are...

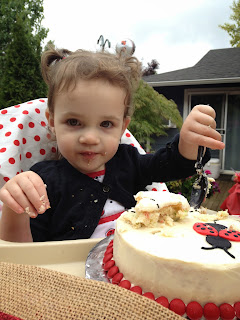
The party ended with our little bug digging into her cake. (I'm pretty sure all she had the entire day was pretzel chips and cake) Oh well, it was her day! 


Singing Happy Birthday!


The highchair bunting was made with scrap fabric, burlap pennants and glitter letters.  

What'd I tell ya? Pretzel Chips all day long! LOL!

Here are some more pictures of the party. It was such a fun day and I truly thank my sister-in-law Jenni for the amazing pictures! She took Lylah out back before the party got started and did a quick photo shoot with her as a birthday gift. The best gift ever! Thanks Jenni! You can check out her site here www.thejarfly.com

The Lady Bug fort...made by my mother and father-in-law out of an old refrigerator box! 

Trying to get a shot of all the kiddos...haha! 

Ring-Around-the-Rosie!

And they all fell down!

So much fun!!
Lylah's 2nd Birthday Photoshoot Pictures...

I love this one!

Happiest when she is on the go!

Just a girl and her balloon!

We LOVE this little BUG!


The party was so much fun! I thank all those who came to celebrate our Lady Bug turning TWO! And people..it seriously does go by fast...so enjoy it while you can! 

Until next time,

Britt


Thursday, May 21, 2015

How to make a fabric nursery mobile.


Oh my goodness...when I started this blog, I had all good intentions to blog at least once a month. I do so many projects throughout the year that I thought it would be cool to share them. I guess life and a very active one year old can put a damper on my blogging plans. Well, while the projects have not stopped...my blogs obviously have. So I'll do my best to catch you up!

Currently it has been nearly a year since my last post. Say what?!?! Time flies! The last project I shared was the matching twin's nursery blankets for a good friend's twin boys (who was preggo with them at the time). Well the boys are nearly 8 months old now and the blankets look so cute in their new little nursery! Here are some pics...

Noah and Silas clearly loving their monogram pillows.
Or at least Noah likes them. Ha! Silas is not so sure.

And here is another one of the whole nursery including the blankets! Isn't it so cute? I'm also loving that my friend (their mama) has moved so close! This is their new room in their new house only about 6 minutes away! Hooray! I can't wait for summer time strolls in the park, with the birds chirping and our babies sitting like perfect angels in their BOB strollers as we chat about simple nothings with the sun shining down...uh...what...too much? Oops, sorry.


Gotta love a twin nursery!!

One of the things that I think make this room so cute are the hanging fabric mobiles over each crib. One of them was my daughter Lylah's old mobile from her room (transitioned out when I switched up her room decor...another post coming soon!), and the other I made to match! They are made out of old lamp shades and scrap fabric. This is a great project for your scrap fabric stash!

So here goes...a tutorial on how to make a fabric lamp shade nursery mobile! 


Lampshade with tapered sides make the best mobiles.


Step one - Find an old lampshade, preferably one that has tapered edges so that the strands of fabric hang without touching each other. 

Step two - Strip all original fabric from the frame of the lampshade. 

Step three - Prepare your fabric pieces. During this step it is helpful to have an overall color theme in mind, and to not get caught up on specific fabric designs. It won't end up making a difference in the end result if your fabric pieces have trains or flowers or geometric designs. The overall color scheme is what you're after. Cut various shapes and sizes of at least 15 different fabrics...i stuck with small squares and triangles ranging from 1-3 inches in length.

Step four - Prepare your fabric strips that will be used to wrap the frame of the lampshade. This process simply consists of cutting long strips about 1-2 inches wide and ironing them in half. You will use the finished ironed seam as you wrap the frame...creating a finished look. The unfinished seam will be hidden as you continue to wrap around itself.

Step five - I forgot to take a pic of this step..but it's pretty self explanatory. Wrap the frame using the long strips and a glue gun. There is no real trick to doing this...your goal is to just keep wrapping and adding dabs of glue periodically. Cover the entire frame.


Here is the mobile after it has been wrapped. For this mobile I chose greens because the other was done in teals and blues. What better for a boy nursery than green and blue! The prepped fabric strips can also be seen here. 

Step six - Decide on length and placement of your strands...I suggest looking at your specific shade and adding strands where there are frame "intersections", wherever the metal frames are welded together. I also added strands in the middle of these "intersections" to add more dimension. Don't forget to add strands to the inside top portion of the shade too. Cut all of your strands of string leaving an extra 2 inches on each to tie to frame. 

Step seven - Using a small yarn needle...begin to string the fabric pieces onto the pre-cut strings. I tied knots about 2-3 inches apart to keep the fabric in place. I also folded the fabric pieces in half and "weaved" the needle in and out of the fabric to create a bunching effect. When attaching the strands to the mobile, I used the needle to "sew" it to the wrapped fabric on the frame. 


Here we are about halfway through.
Flipping the shade upside down makes attaching the strands easier.  
Step eight - After attaching all strands...flip over and marvel in your success! You are now a baby nursery fabric lampshade mobile making queen (or king). Now that's a mouthful! But seriously, you just made a pretty sweet mobile that your baby will love! 

Here they are side by side! I love that they are different but correlate very nicely together. 


The finished product hanging in their nursery! 


Thanks for reading! And hopefully my next post won't be a year in the making...here's what's coming in the very near future.
  • CHALK PAINT! It's freaking awesome...I've pretty much painted every piece of furniture in my whole house. So multiple posts coming on this.
  • Lylah's big girl room remodel. 
  • Backyard decorating.
  • Lylah's 2nd birthday...her ladybug birthday extravaganza! 
And a special thanks to my BFF Coco for letting me plaster pictures of her cute boys all over the internet. Muah!

Until next time,

Britt